


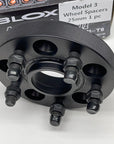
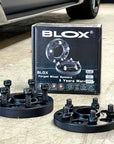
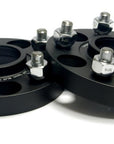
Model 3 & Y BLOX Aluminum Forged Wheel Spacers (1 Pair)

Fits:
- All 2024+ Model 3 Highlands
- All 2017-2023 Model 3’s
- All Year Model Y’s
Ordering: If you want spacers on both your front and rear wheels, be sure to place 2 sets in your shopping cart. Either 2 sets of 18mm or 25mm or 1 set of each. Some customers order only 1 pair for the rear so we sell them in sets.
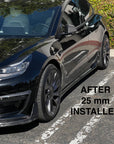
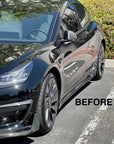
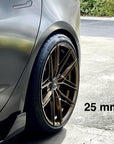
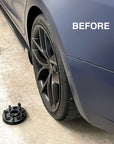
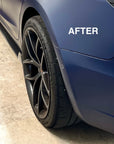
Give your Model 3 or Model Y an aggressive look with a wider wheel stance with these BLOX Forged Wheel Spacers. These spacers will extend your wheels outward as much as 1".
If you are tired of the the passive recessed look of your wheels, these will make a big difference. These spacers are the best money can buy, made from Forged Aircraft Aluminum (6061-T6). They have a 5 year warranty from the manufacturer and they will make your TESLA look amazing.
For the last few months, we have tested both thicknesses on our Model 3 & Y, and these spacers do not interfere with the traction control systems or the braking systems in anyway. Some say spacers improve handling, but overall the difference is honestly negligible. We have them installed on our TESLA's because we just love the look.
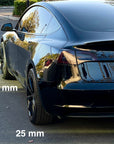
HOW THICK: We have installed the 25mm spacers on all 4 wheels for some customers. This gives the front a rear an equally aggressive look, and we also have installed 25mm on the rears and 18mm on the front providing a wider rear stance. Regardless, there are no right or wrong choices when it comes to picking your spacer's thickness. That is why we have 2 thicknesses to choose from. See our photos for many variations.
Which Spacer Thickness Fit Your TESLA's Wheels?
We have tested all TESLA stock wheels because of potential pocket depth shortages between the wheel spokes, and we found the following issues for all Model 3 and Model Y.
MODEL Y: You have to order 18mm or 25mm. All other wheels and thicknesses work.
MODEL 3: All thicknesses work unless you have the have Tesla's Track 20" wheels, because of its short pocket depth. For the 20" Tesla Track wheels we recommend 25'' for the rear and at least 18mm for the front wheels.
AFTERMARKET WHEELS:
For aftermarket wheels, we recommend you measure the pocket debt between your spokes before ordering. The spokes need to accommodate the TESLA stock studs. The threads protrude 27mm for stock rotors and 32mm for the performance rotors. If you do not have the clearance on your aftermarket wheels the stock TESLA threads will bottom out on your wheels.
**Confirm specs of your wheels to ensure you get the correct spacers**
FEATURES:
Made from High-Strength Aircraft Aluminum Alloy (6061-T6), Lightweight, Forged. Hard Anodized for durability and corrosion protection.
Precision Engineered Hub-Centric and Model Specific for Perfect Fit and Wheel Balance.
Limited Life Range Tested for Wheel Bolts/Stud (1 Million Times) in accordance to ISO3800.
Strength-Tested for Applications (Bolt/Stud/Nut) in accordance to ISO898-1,ISO898-6,SAE J429,SAE J995.
Anti-Rust Tested (NSS 72 Hours) for Applications (Bolt/Stud/Nut) in accordance to ISO9227.
5 Year Warranty.
*** Max Torque spec is 129 ft/lbs for all studs. 10 studs per corner. Factory spec is 129 ft/lbs but only applies to OEM 21mm nuts attaching to OEM Tesla studs *** Spacers are for "off road use only".
BLOXSPORT SPACER INSTALLATION GUIDE
This tutorial will give you a basic step-by-step guide to help install our spacers onto your model 3/Y.
Tools Needed:
- 21mm socket for OEM lug-nuts
- 10mm socket to remove OEM rotor retaining bolts
- 19mm socket for to secure spacer to the OEM studs.
- Floor jack
- Jack Pad
- Torque Bar
- Brake pedal pressing for torquing before lowering you car.
INSTALLATION:
On a level surface jack up the corner of the car you will be working on and make sure to secure the vehicle with a jack stand as a safety precaution. Please be aware that jack pucks should be used to reference the factory jacking points. We suggest putting a jack stand under a solid member that will not move as a safety precaution.
Remove factory lug-nuts with 21mm socket
Once removed you will see a 10mm retaining bolt on the rotor that will need to be removed.
Once removed you can clean any surface rust with a wire brush prior to installing the spacer. If you live in an area that sees snow or salt, you should apply anti seize around the hub protrusion to prevent the spacer from getting stuck due to mineral deposits and salt mixing with moisture.
We recommend applying Blue Loctite onto the factory studs prior to installing the spacer. This will help to ensure that the nuts do not come loose.
Buy Loctite HERE
If you do not want to use Loctite we recommend that the vehicle be driven for 100 miles. After 100 miles, remove the wheels and retorque the lug-nuts that attach the spacer to the OEM studs.
(Note: If Loctite is installed) Loctite is applied prior to installing the spacer to the hub. Once the spacer is installed you can use the supplied shallow 19mm lug-nuts and tighten the spacer to the factory studs.
For the front wheels you will need assistance from another person to hold down the brakes so you can torque the 19mm shallow lug-nuts to 129ft/lbs. In the rear the parking brake will prevent the wheel from spinning so this isn't an issue.
Now that the spacer is installed and torqued down you can install the wheel onto the spacer and torque the lugnuts to a max of 129ft/lbs.
Repeat steps above for the other 3 corners.
*** Max Torque spec is 129 ft/lbs for all studs. 10 studs per corner. Factory spec is 129 ft/lbs but only applies to OEM 21mm nuts attaching to OEM Tesla studs *** Spacers are for "off road use only".
VIDEO:
Our installation videos provide the necessary information to correctly install our products. Therefore, we strongly recommend that you watch the installation video/s both before ordering and before installing our products.